Sunday, 13 March 2016
Letzcraft: Happy Birthday
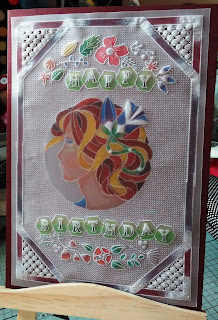
Letzcraft: Happy Birthday: Hello everyone this is my choice for mid challenge ALL ABOUT THE GIRLS I'm am new to the parchment craft so I thought give another go ...


Happy Birthday
Hello everyone this is my choice for mid challenge ALL ABOUT THE GIRLS
I'm am new to the parchment craft so I thought give another go but adding stamp to this project to give a bit of difference so lets begin
Clarity stamp Madeline
Clarity Groovi mini system
Clarity parchment/Clarity groovi system
Butterfly wreath plate
octagon plate /square plate
High Tack tape/ Faber Castell polychrome colour pencils
Versa magic Cloud white chalk ink
Tumble dryer sheet
Pergamno scissors
Lets begin Stamped my image in white ink pad and left to dry naturally for about half an hour turn parchment over and work on the reverse side rubbing your tumble drier sheet over first so your tools can glide easily
Then with the square plate measure it up and do the corners with boarders
The mini groovi system put Happy birthday in
the butterfly plate add parts of the wreath I added couple of the leaves hear and their till you are happy with what you have done
On the reverse still use your bigger tools and soft side of mat I did the white work remember don't press to hard I learnt the hard way light feathery strokes till desired look don't forget let your work rest in between to stop it buckling
This is my straight grid I'm waiting for my clarity one to come with tape placed on the grid doing every hole on the center piece make sure you do this bit from the front of your work
Now the corners pierce four holes in a square then leave four holes square free its quiet easy when you get into it just don't lose concentration or like me you will put holes in wrong place
then turning over your work add circles in with the bigger ball tool in the squares that you left plain
this I have got into doing love this on the reverse again with the smallest tool and soft side of the mat very gently stipple the corners but don't press to hard or your tool will pierce couple times is ok but don't want it happening to often now you can colour on the reverse to do your corners place your scissors up right with the tips in the hole bring them down gently then twist and snip doing this on all corner you will get your crosses I hope you enjoyed this I like doing this very calming thank you for joining me

Tuesday, 1 March 2016
Letzcraft: Friendship
Letzcraft: Friendship: Hello everyone thanks for joining me this months change for Clarity challenge is all about the girls I love this pocket stamp so this is wh...


Friendship
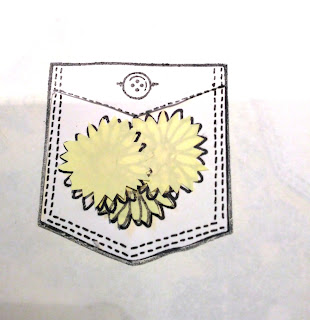
Hello everyone thanks for joining me this months change for Clarity challenge is all about the girls I love this pocket stamp so this is what I thought I would do hope you enjoy this here is a list of items I used
The Gelli plate /brayer/copie paper
Clarity star stencil / Clarity chain word / Clarity single flower / Clarity Pocket stamp
Fresco Finish acrylic paint Lilac / lake Wanaka
Adirondac Black ink pad / Slate / Distress ink pads Shaded lilac Weather wood Lemonade Mustard seed /Versamark black ink pad
Promarkers
Clarity stencil card
Lets get started
Masking tape / stencil brushes /make up sponge
Lets get started
I stamped my pockets on to copie paper cut out with my gelli plate and brayer put drop of each of the paints one on each of two corners spread the lilac first with the brayer then the lake just so they joined but not to combine to much still wanted them separate I put the cut outs of pockets in desired place then applied my stencil. Take a piece of copie paper apply to this smooth with your hand remove the stencil and put you gelli card on smooth then pull your print
Then when dry you can start your work on next step, stamp your Pockets into place
Then add notelet masks Apply masking tape around the out side to leave a boarder as want to keep this white.
With your stencil brush in lemonade ink pad you can start by building up your colour around the edges and around the pockets, I added a little mustard yellow to sharpen it a bit more
with a piece of copie paper stamp pocket in the middle this is going to be a mask to do your detail on the pockets with a craft knife, cut out the bottom part of the pocket leaving the flap in place
Now with shaded lilac and Slate ink pad put your blending in with stencil brush and make up sponge till desire look we will build up the rest of colour with the promarkers Take of the copie mask with masking tape mask of the flap and do the same as you did the pockets,
Stamp Frienship in the corner using versamark Black. Using promarkers blend around the edges and around the flowers in different blues and greys to get that feeling of washed out jeans flowers use oranges and yellows to make the pockets pop hope you enjoyed this I did Thank you for coming along to my blog hope you will join me again soon xx

Subscribe to:
Comments (Atom)


