Tuesday, 17 May 2016
Letzcraft: Time for something new
Letzcraft: Time for something new: Hello everyone this is my second project of the month for the Clarity challenge ANYTHING GOES I know we are not on Autumn but I ...


Time for something new
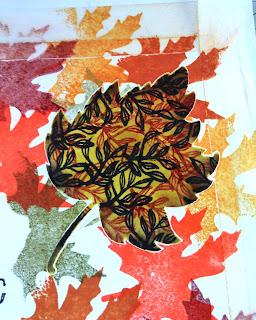
Hello everyone this is my second project of the month for the Clarity challenge ANYTHING GOES I know we are not on Autumn but I love the colours and the leaves my idea was to show a number of techniques the finished looked reminded me of a cushion so added stitching around the out side well less talking for me lets get on
I used
Clarity Gelli card
Distress ink pads Aged Mahogany / wild honey /Ripe persimmon/crushed olive /rusty hinge /forest moss/ bundled sage
Adirondack pitch black
Claritys stencil brush/make up sponge /masking tape /black promarker with fine point
Clarity club stamp time for something new small leaf stamp /Clarity leaf stencil /Notelets
Grunge paste
Lets get started
Stamp sentiment in middle of card in black then without inking up again straight on to the notelet rip around the edges of mask as wanted a mask that was not square. Now move on with maple leaf stamp using all the different inks that have put above
do remember to clean stamp in between stamping don't want to contaminate pads
once you have finished stamp place stencil using masking tape and use you grunge paste do this in both corners and wait till completely dry
recover each leaf with the stencil using make up sponge use crushed olive cover all of leafs
the with black in stamp the little leaf then go in with the rust ink pad and stamp to cover in the rest of the gaps then with make up sponge bring in the ink that is on the stencil around edges then on the next I used mahogany and black did the same
remove all go around the out side with the honey ink pad and the stencil brush till you have desired effect then with out loading brush again take the whiteness of the middle
take masking tape off and draw stitching around the out side of card and do squiggles in the center
Do hope you have enjoyed this thank you for visiting my blog do come back again soon

Sunday, 1 May 2016
Letzcraft: Anniversary
Letzcraft: Anniversary: Hello everyone this month Clarity challenge is anything goes so for this part of the challenge I would do a parchment hope you like what I ...


Anniversary
Hello everyone this month Clarity challenge is anything goes so for this part of the challenge I would do a parchment hope you like what I have done I will show you how I produced this piece
Clarity parchment A4
Clarity groovi start system
Groovi club Daisies plate/ occasions boarder plate /square plate
Lace boarder 2 plate /Clarity straight piercing plate
Clarity club groovi system
Faber castell poloychromo colour pencils /brads
Lets get started
With the square place in the groovi system I used a tumble drier sheet so my tools would glide well I did the largest square first then without moving anything then did the third square in
with the club small groovi system I used the daises plate from Clarity club
I lined up my squares buy moving parchment so I have two equal squares in both corners with boarders around them
Still using mu square plate I made squares in the corners with the lace boarder plate used the heart only in the corners then you will notice further down I put two in the middle of the square all around with the tear drop from boarder added love And the Anniversary
With my piercing plate on the right side of your work ad pricking I did 4 wholes square and 4 space squares and so on
with soft part of my mat on the reverse side of work added white shading between the pricking plus around the little square boarders then used my smallest tool to do strippling carful not to pierce the work you get nice dotted effect Sorry missed photo out here I put back in my square plate joined up the squares with boarder around to make one large square and still using this plate used smallest square to put another two squares in each corner in the middle of the tiny square I used off the main board what looks like a star
put the daisy heads in the boarders. Then went back in with soft board to put the rest of the white work on the tiny squares I used my smallest tool did this with a scratching effect just in the corners turn board over to hard side to do colouring in don't forget to let your work rest doing to much white work in one go will make it buckle I learnt the hard way
With your scissor with a twisting motion cut your crosses best to practice on old piece of parchment first
Hope you enjoyed this please come back to my blog again Thank you

Subscribe to:
Comments (Atom)


